

gluten-free swedish prinsesstarta!
/
GLUTEN-FREE SWEDISH PRINSESSTARTA
SKIP TO RECIPE
Wowee-wow-wee-wow! I can't believe I made this cake. You might know it best from your last trip to IKEA. You know, the trip that started out full of dreams of a stylishly redecorated living room and ended with you cursing every other shopper, a cart full of knick knacks you don't even need, and nothing for your modular, clean living room? But, at least, you enjoyed your 2-dollar meatballs and this sweet, sweet Princess Cake.
I decided to make this cake since one-half of my in-laws are big into their Swedish heritage and we had a festive Swedish luncheon the other weekend. I watched the contestants on The Great British Baking Show make one and I thought, "Hey, I think I could do that!" Nevermind that I don't really like marzipan and I'm not actually Swedish. (Shhh... I'm actually part Norweigan.)
So, I went to the magic of The Google and found a blog that had what looked like a very authentic recipe for this oddly-colored green cake. Not only did it look do-able, it also looked very easy to convert to gluten-free. As it turns out, many Swedish recipes use a limited amount of regular flour because for a long time wheat flour was a luxury item since wheat was difficult to grow in Scandinavia. Instead recipes relied upon colder-weather crops like potatoes and incorporated potato starches and flours that could be produced locally.
Well, goodie goodie for me because potato starch is GLUTEN FREE! So, I went for it. I didn't have the time to research and track down a pre-made marzipan that I trusted was gluten-free, so I decided I'd just make my own. And, really, I promise you, it's not that hard to do! And, I might add that I've never liked marzipan, but I liked this marzipan.... maybe because I could control how almond-y it was?
Like any bake, if you break it down into chunks (or as my son's teacher advises her students to do-- chunk it up), you can make anything. It's ok to be intimidated. I was definitely giving myself a pep talk as I worked my way through a few of the steps for this cake. But, I did it. And, it turned out amazingly. And, now I'm going to try to tell you how you can do it, too.


Swedish Prinsesstarta (serves 12ish)
- FOR THE MARZIPAN, (makes enough plus some for this cake)
- 2 cups almond meal, use blanched almonds (Bob's Red Mill is a great source)
- 1.5 cups powdered sugar
- 3 tsps almond extract
- 4 tsps cane syrup
- green food gel
FOR THE SPONGE CAKE - 4 eggs
- 1 cup (225g) granulated sugar
- 1/2 cup (62g) gluten-free flour
- 1/2 cup (80g) potato starch
- 1 tsp baking powder
- finely-ground gluten-free breadcrumbs, for dusting the pan
FOR THE VANILLA CUSTARD - 1 cup heavy cream
- 4 egg yolks
- 2 Tbsps corn starch
- 2 Tbsps granulated sugar
- 2 tsps vanilla extract
FOR THE WHIPPED CREAM - 3 cups heavy cream, whipped
- 1 tsp plain powdered gelatin
- 1.5 Tbsp cold water
- 1.5 Tbsp boiling water
FOR ASSEMBLY - raspberry jam
- powdered sugar for dusting
- fresh berries
So, like I said, it can help to break this recipe apart into chunks. For example, I made the marzipan on Thursday, the cake and custard on Friday, and whipped the cream and assembled the cake on Saturday. You definitely could do it all in one day, but I do think chilling your marzipan for at least a day is a good thing.


I was anxious about making marzipan, mainly because I don't even like marzipan. How would I know if it "worked" or not. And, it didn't help that I was planning on tweaking the recipe-- dropping the egg whites and the rosewater (gross!). Technically speaking, I actually made almond paste and not marzipan-- marzipan has rosewater in it, but, like I said before- yuck. So, here's how I did it and I think it definitely worked. Add 2 cups of blanched almond meal and 1.5 cups powdered sugar to your mixer. Pulse to combine. Add 3 tsps almond extract and 4 Tbsps cane syrup to the dry ingredients and blend. (I use cane syrup because it's not overly sweet, but you could use light corn syrup if you'd rather.) Watch the mixture.... is it starting to ball up? Mine didn't, so I added 1 Tbsp water and it balled up right away. Next, add your food coloring gel. Prinsesstarta's are traditionally a light Spring green-- this could be your Easter cake!-- but feel free to make your marzipan any color you want.
Now, here's where you can tweak it a bit. After I added my food coloring gel, my marzipan seemed too wet and a bit dark-- cane syrup is not as lightly-colored as corn syrup. So, I added another 1/8 cup of almond meal which is lightly-colored. This lightened up my marzipan and made it less wet.
Once you like the color, taste, and general consistency of the marzipan, take it out of your mixer and form it into a log. Wrap it tightly in plastic wrap and place in the refrigerator. It will become firmer in the refrigerator and can keep 1 month in the fridge and up to 6 months in the freezer.
Now, you're probably feeling a bit of confidence, like you're actually going to make this cake, you really, really are. So, let's move onto the sponge cake. Begin by preheating your oven to 350 degrees. Butter and then dust a 9"x2" round baking pan with gluten-free breadcrumbs. I was very skeptical about this breadcrumb business and I think you could probably dust with granulated sugar or more gluten-free flour, but I was going all-Swede on this, so I followed the recipe and dusted with some Schar's gluten-free breadcrumbs I had in the pantry. After all, YOLO!


Take out your Kitchen Aid and beat the eggs and sugar on high until lightly-colored and fluffy. Wondering what attachment to use? Well, I started with my paddle attachment and beat the mixture on 8 for 4-5 minutes, but did not feel like the mixture was getting "fluffy." So, I switched to the whisk attachment and whipped the mixture on 10 for another minute. Aha! Now, I had fluffiness and air bubbles which is important for "the spuunge" as they say on The Great British Baking Show.
Mix your gluten-free flour, potato starch and baking powder together. Fold these dry ingredients carefully into your egg/sugar mixture. As you fold it in, you'll really notice the fluffiness and volume you have created.
Pour the mixture into the buttered and breadcrumbed pan and place in the lower portion of your pre-heated oven. I rotated my pan after 20 minutes and, by this point, the cake had puffed up to the top of the pan. I baked it for another 10 minutes, but it still seemed slightly jiggly in the middle. Another 5 minutes, and then decided to leave it in for another 5 to try to get it more golden. Ta-da! After 40 minutes, it was done! Definitely keep an eye on it for those last 10 minutes as your oven may bake differently than mine. Let the cake cool slightly in the pan before removing it to a rack to cool completely.
Yeaaaah, about that removing bit... how to remove the cake from the pan without ruining this beautiful "spuunge" you've created? My advice? It's. Just. A. Cake. Don't be too precious about it. Show it who is boss and if that means taking a butter knife to the edges, do it. I ran a knife around the circumference of the cake and even wedged it underneath to coax the cake out of the pan. Could you use a springform pan? Probably. Could you butter and breadcrumb better than I did for an easier release? Probably. But, I did it how I did it, and I was very impressed with how it all turned out! As the t-shirts in middle school used to always say, "No fear!"
I waited a day to cut and assemble the cake, so once my cake cooled completely, I covered it gently with saran wrap, kept it out of the sun, and left it on the countertop until I needed it. Whatever you do, do not place your cake in the fridge. It will dry your cake out. The horror!


Now, the vanilla custard. According to the recipe, you could make your custard a day ahead of time and store it in the fridge until you're ready to assemble the cake... if you use corn starch, instead of more potato starch. I knew that a relative of mine cannot tolerate corn, so I opted to use tapioca starch which has often worked as a suitable substitute for corn starch. Weeeelllll, either I didn't make the custard quite correctly (entirely possible) or you cannot sub tapioca starch for corn starch when it comes to custards. I don't know the answer. (Yet.) Next time I make the cake, I'll have to work harder on the custard because although I thought it was thickening up nicely, when I went to build the cake the next day, my custard was delicious, but was not stiffened and thick at all. So sad, so I will tell you the recipe for the vanilla custard as if you're using corn starch and you should expect it to work better than my tapioca starch vanilla custard.
Add 1 cup heavy cream, 4 egg yolks, and 2 Tbsps each of corn starch and sugar to a small saucepan. MIx the ingredients together using a silicon spatula or whisk. Cook mixture over low eat, stirring constantly, until the custard thickens. I thought mine was getting thick after about 10 minutes, but in retrospect, I maybe should have gone a bit longer. That said, once you feel like your custard is truly thick, remove it from the heat and gently mix in 2 tsps of vanilla extract. Once cooled, you can use it in your cake. I transferred mine to a bowl and let it sit overnight in the fridge.
Hang in there, now. We are so close to assembling this very special treat. If you're chunking this up as I did... you made your marzipan on Day 1, your cake and custard on Day 2, and it is now Day 3. Begin the day by taking your marzipan from the fridge to let it warm up for easier rolling out. Pull out your trusty stand mixer again... we're going to whip some cream! Remember that a chilled bowl and whisk attachment will make your whipped cream whip up and hold it's shape better, so be sure to chill the bowl and attachment first.
Since a perfect Prinsesstarta really domes up on top, you're going to want some very strong whipped cream which is why I opted to make stabilized whipped cream. It's super-easy and a good trick to keep in your back pocket. Place 1.5 Tbsps cold water in a small bowl. Add 1 tsp plain gelatin to the water and let it sit, aka "bloom" for 5 minutes. While this "blooming" process is happening, add 3 cups of heavy cream to your chilled stand mixer and whip it up until it is nearly done. After the 5 minutes of blooming, add 1.5 Tbsps of boiling water to the gelatin bowl and mix it together until gelatin is totally dissolved. Pour this gelatin/water mixture into your whipped cream and finish whipping the cream. Hooray- you made stabilized whipped cream! Stabilized whipped cream will stay stiff and diner-pie-slice like. That is, it will not weep and get runny.
Now, you are ready to assemble your Prinsesstarta! Unless you have one of those cool layer-cake-slicing-tools, you might need a bit of a pep talk before slicing your cake into thirds. I know I did! But again, you just have to dive in and do it. I used a serrated knife and placed the cake on an upside down sheet pan to get a little better leverage and to allow me to spin the cake as I cut. The top layer should be slightly thinner than the two bottom layers.... mine did not turn out this way, so don't beat yourself up if you can't manage it. The cake will turn out just fine, even if your layers are all the same thickness.
Place your bottom layer on a cake stand or your serving plate. Spread a nice big dollop of raspberry jam over the bottom layer. If your vanilla custard is nice and thick, you can pipe it on top of the raspberry jam and then sort of spread it around to even it out. As I mentioned before, my custard was a flop. It tasted delicious, but was nearly soup. I added a bit of whipped cream to try to thicken it up, but it really didn't do much. But, unfortunately, I was past the point of no return, so I had to use the soupy custard. And, you know what? The consistency of the custard really didn't matter too much in the end. Yes, it probably made the bottom layer of my cake a bit wetter than usual and Mary Berry would have found fault with it, but no one else was the wiser and the cake tasted delicious. DE-LISSSSH-US!


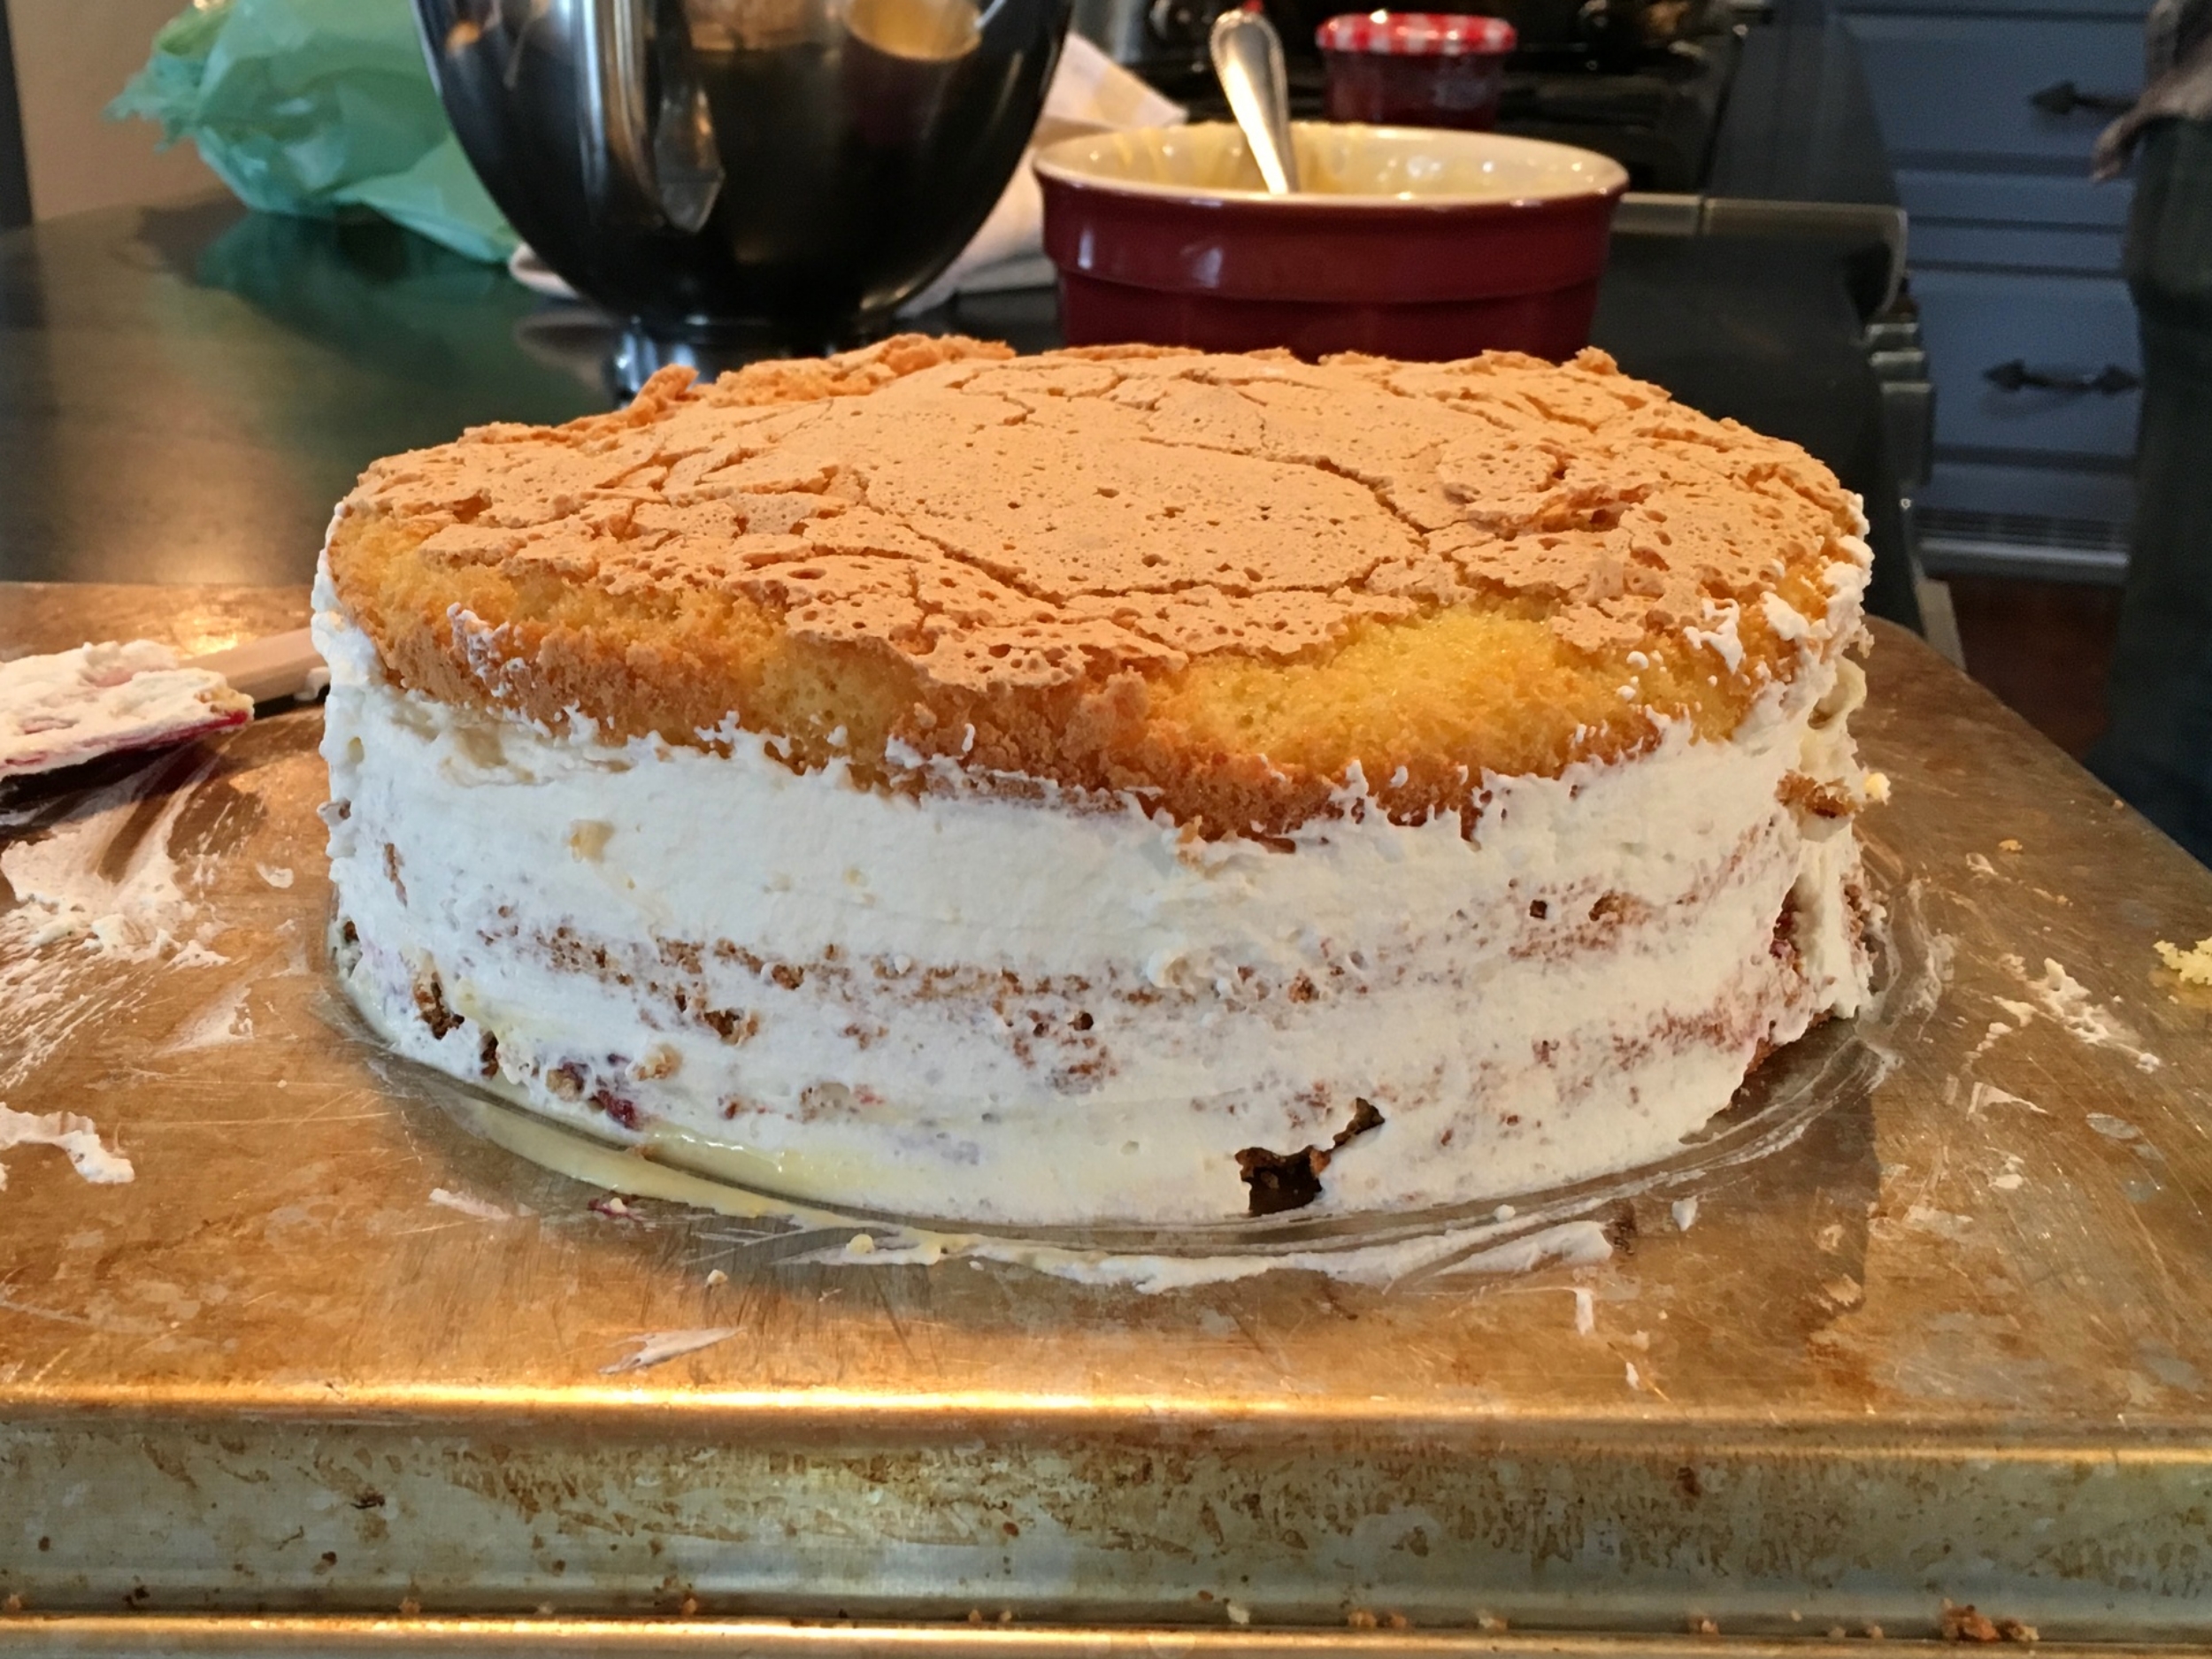


After spreading your custard and jam on your bottom layer, place the middle layer of cake on top. Pipe or mound up a bunch of your whipped cream (nearly 2/3rds of it) on top of this middle layer and place the top layer of the cake on top of this mounded whipped cream. Since my custard was so liquidy (and delicious), I drizzled a bit of custard over the top of the cake to soak into the top layer. Then, to help your marzipan layer stick to the cake, spread the sides and top of the cake with a very thin layer of whipped cream. You should still be able to see the cake through the whipped cream.
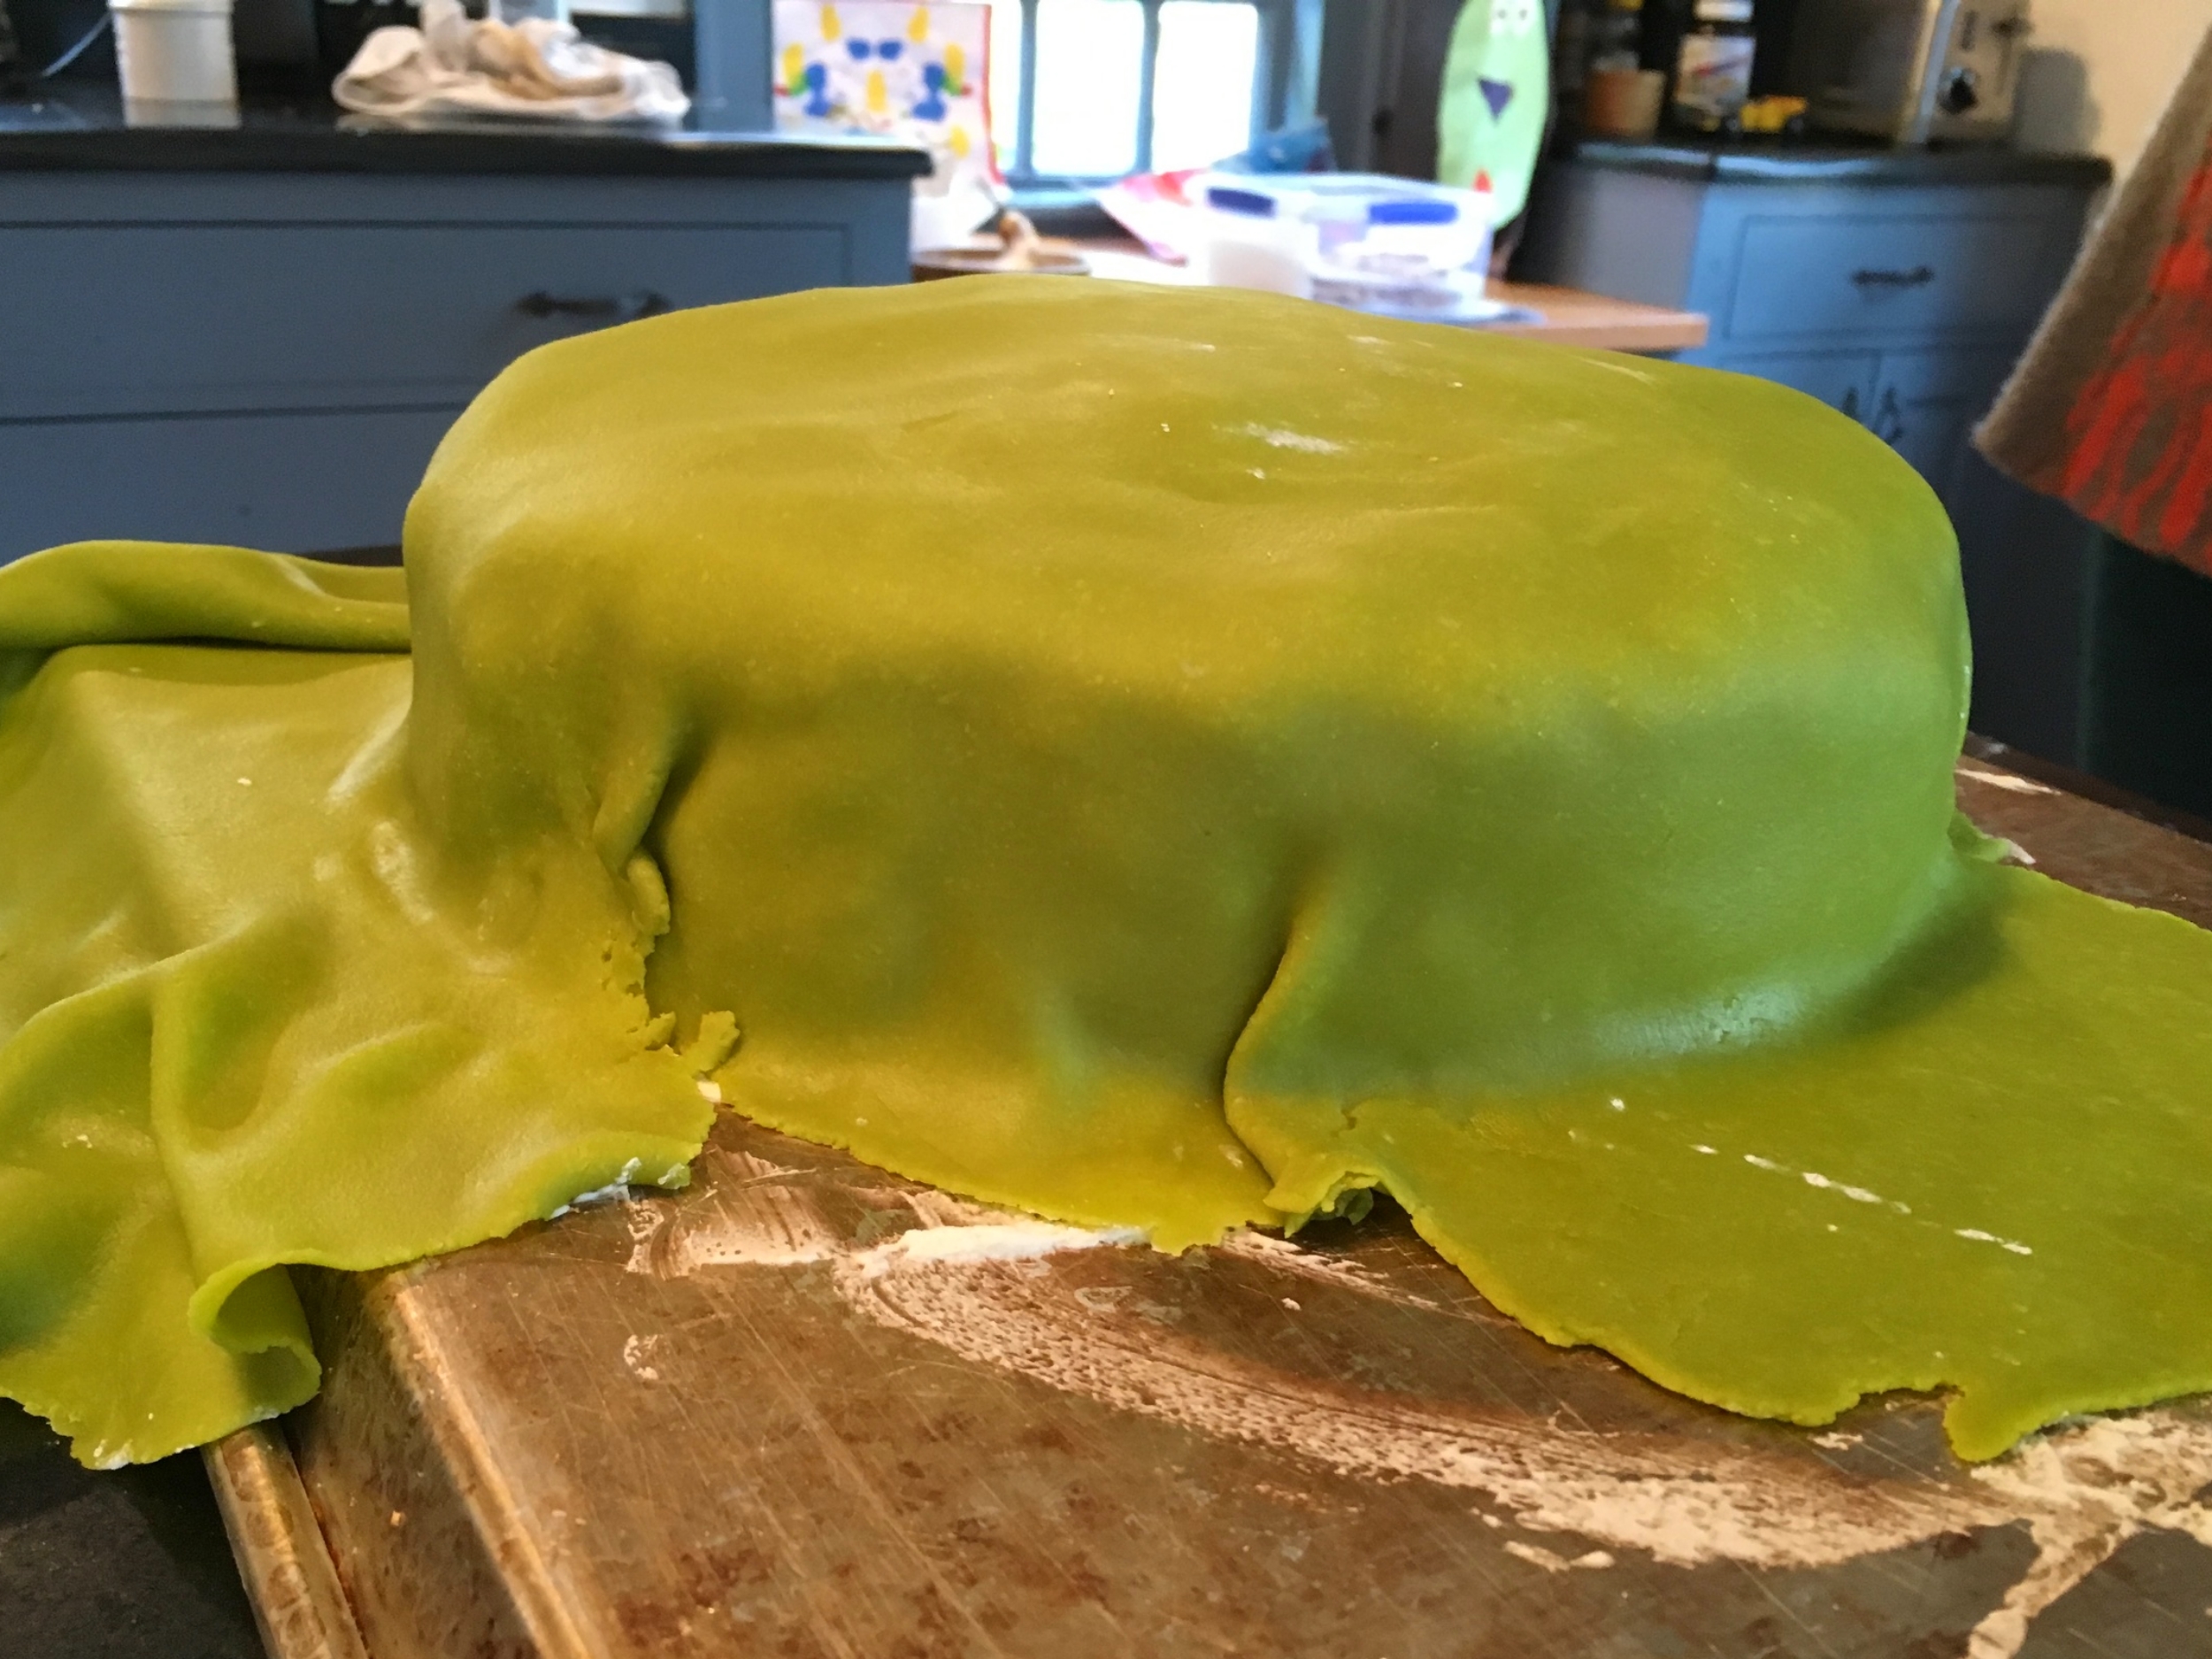
Now, you get to roll out your marzipan! Dust your work surface & rolling pin with a bit of powdered sugar and knead your marzipan log like bread dough to warm it up just a bit more. Since you have a 9" cake with 2" sides, you need to roll your marzipan out to at least 15" in diameter (9" across the top + two-2" sides + two-1" of extra for wiggle room). There is a surprising amount of math involved with baking, right? As you roll, lift the marzipan up & flip it gently every now and then to help keep it from sticking to your counter top.
Once you reach 15" diameter, roll the marzipan carefully up and around your rolling pin and then unroll it off the rolling pin, draping it over your cake. You can do this on your own, but if you can recruit another set of hands, I highly recommend it. Thank goodness, my sister-in-law was around to cheer me on and lend her hands as we carefully covered the cake and attempted to smooth out the bumps and bubbles. Take a knife and cut the extra marzipan off around the bottom of cake, trying to tuck the edges in under the cake.
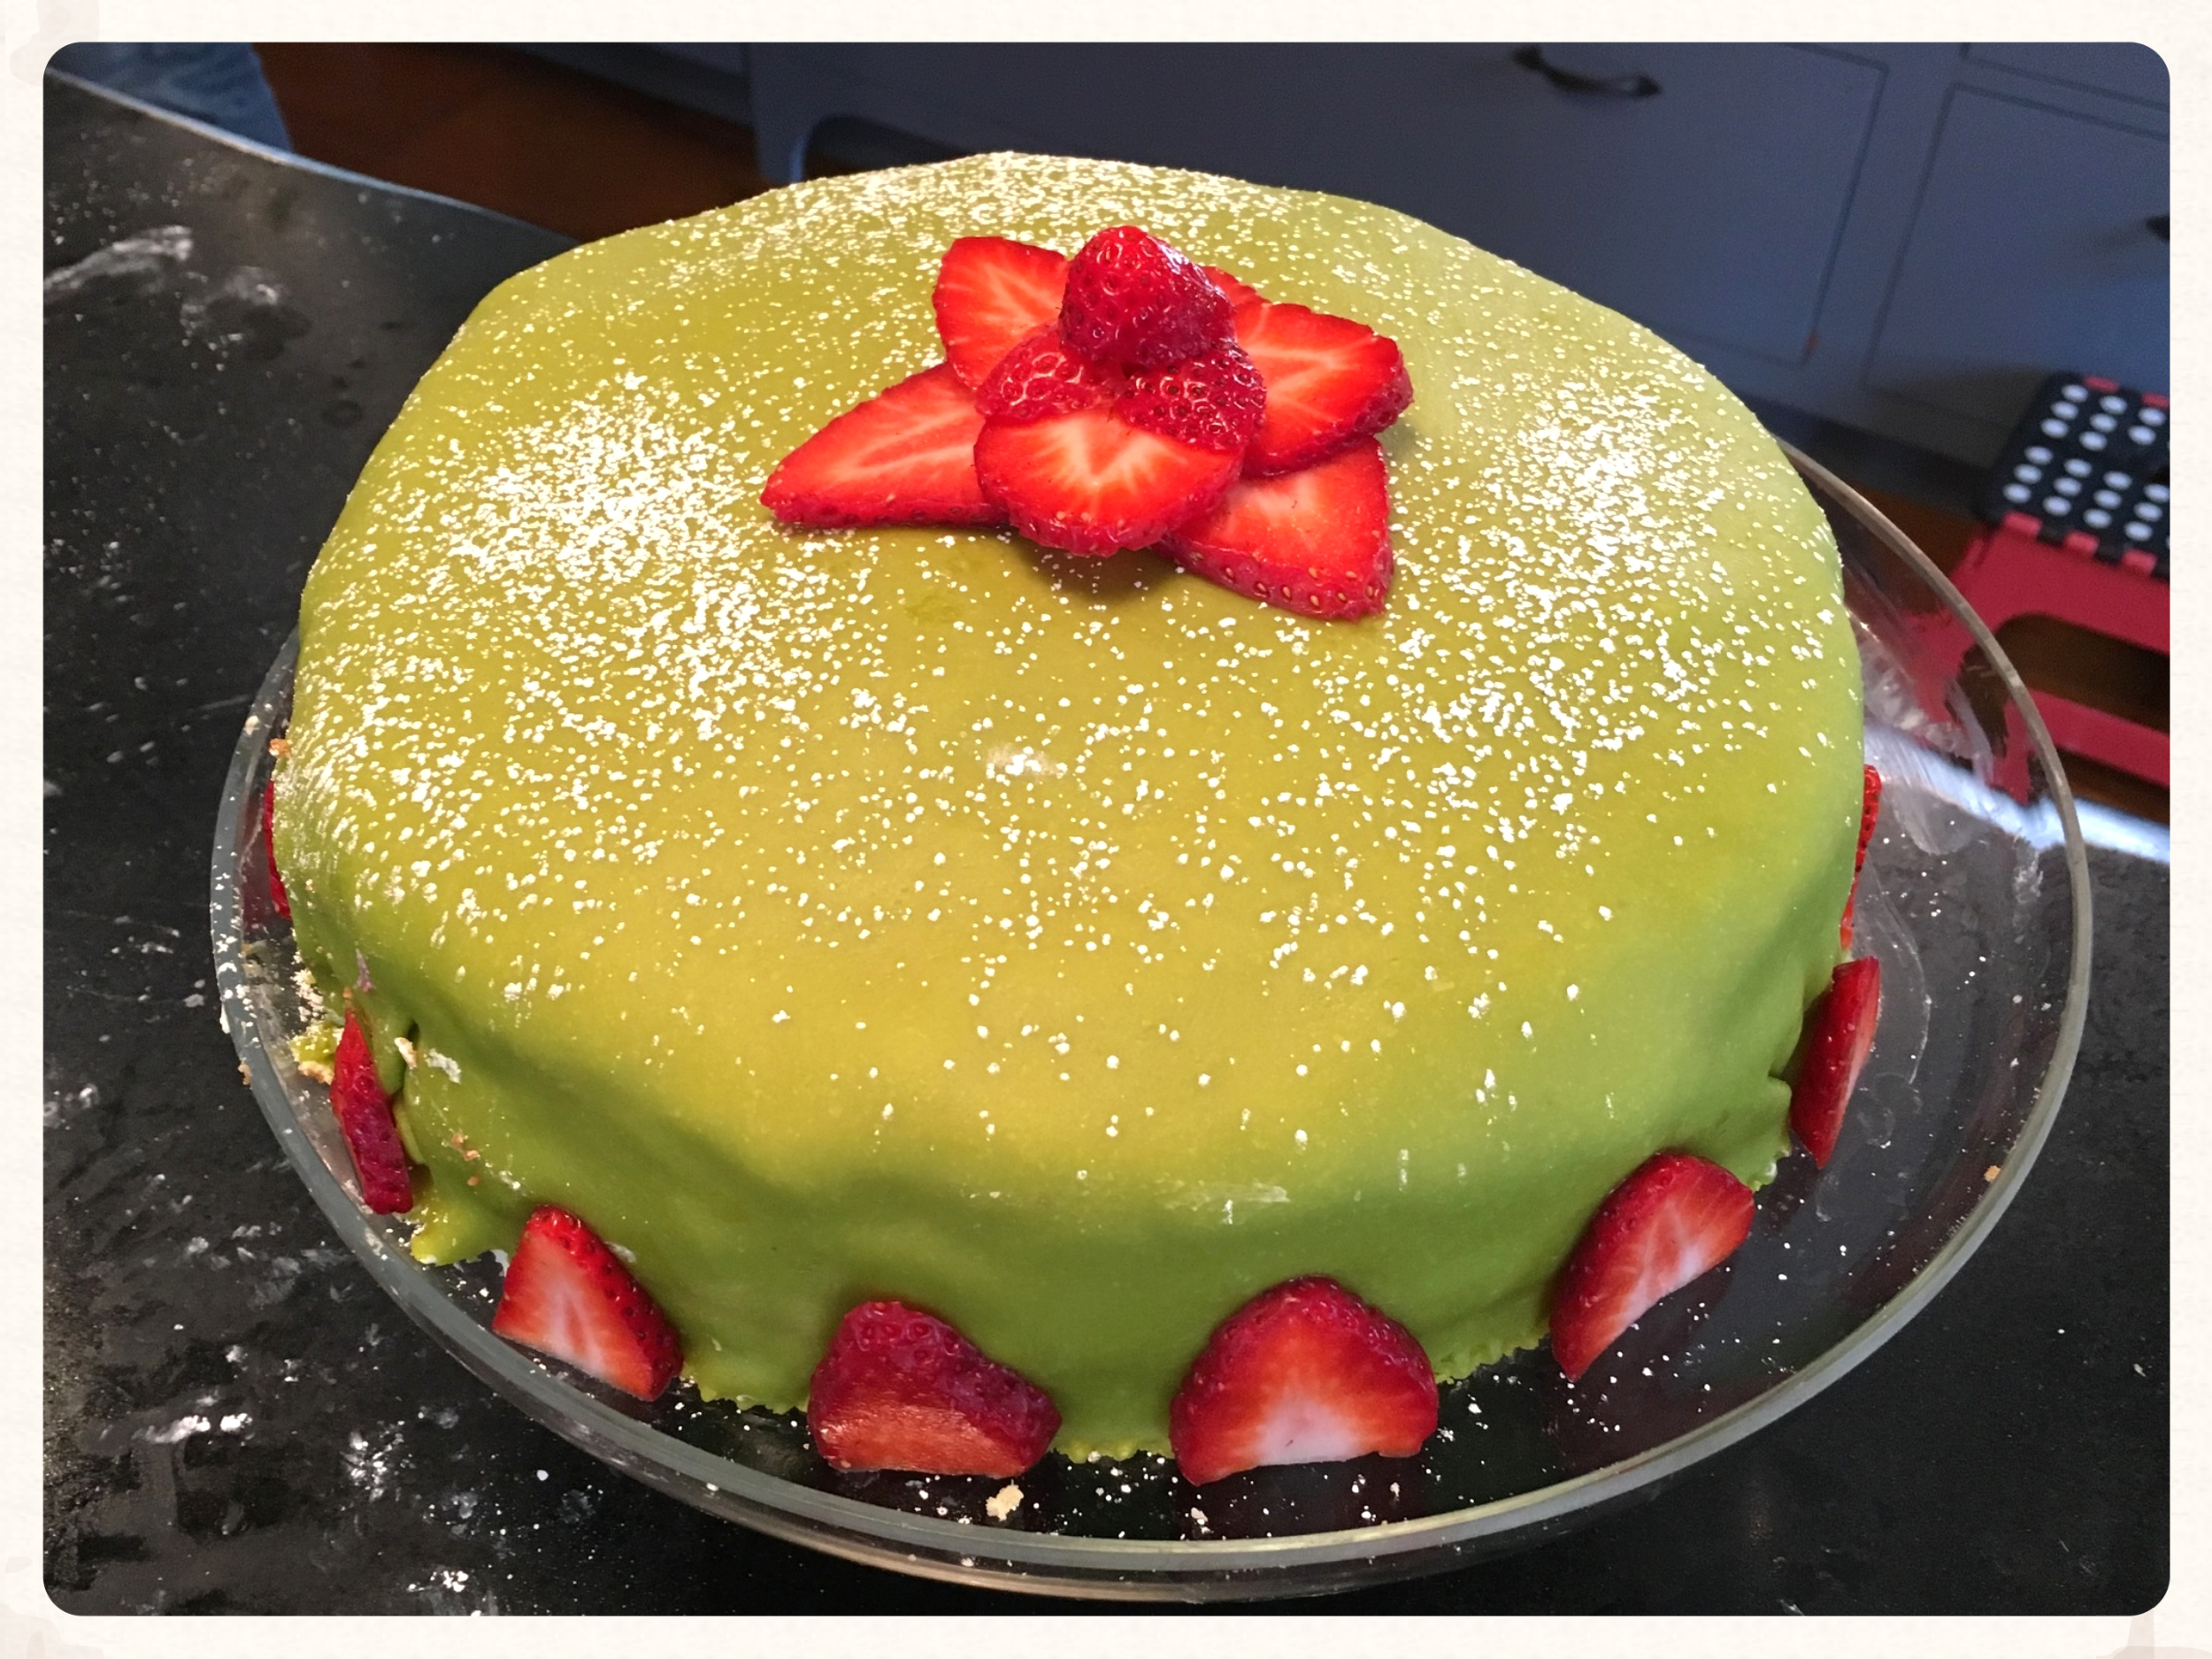
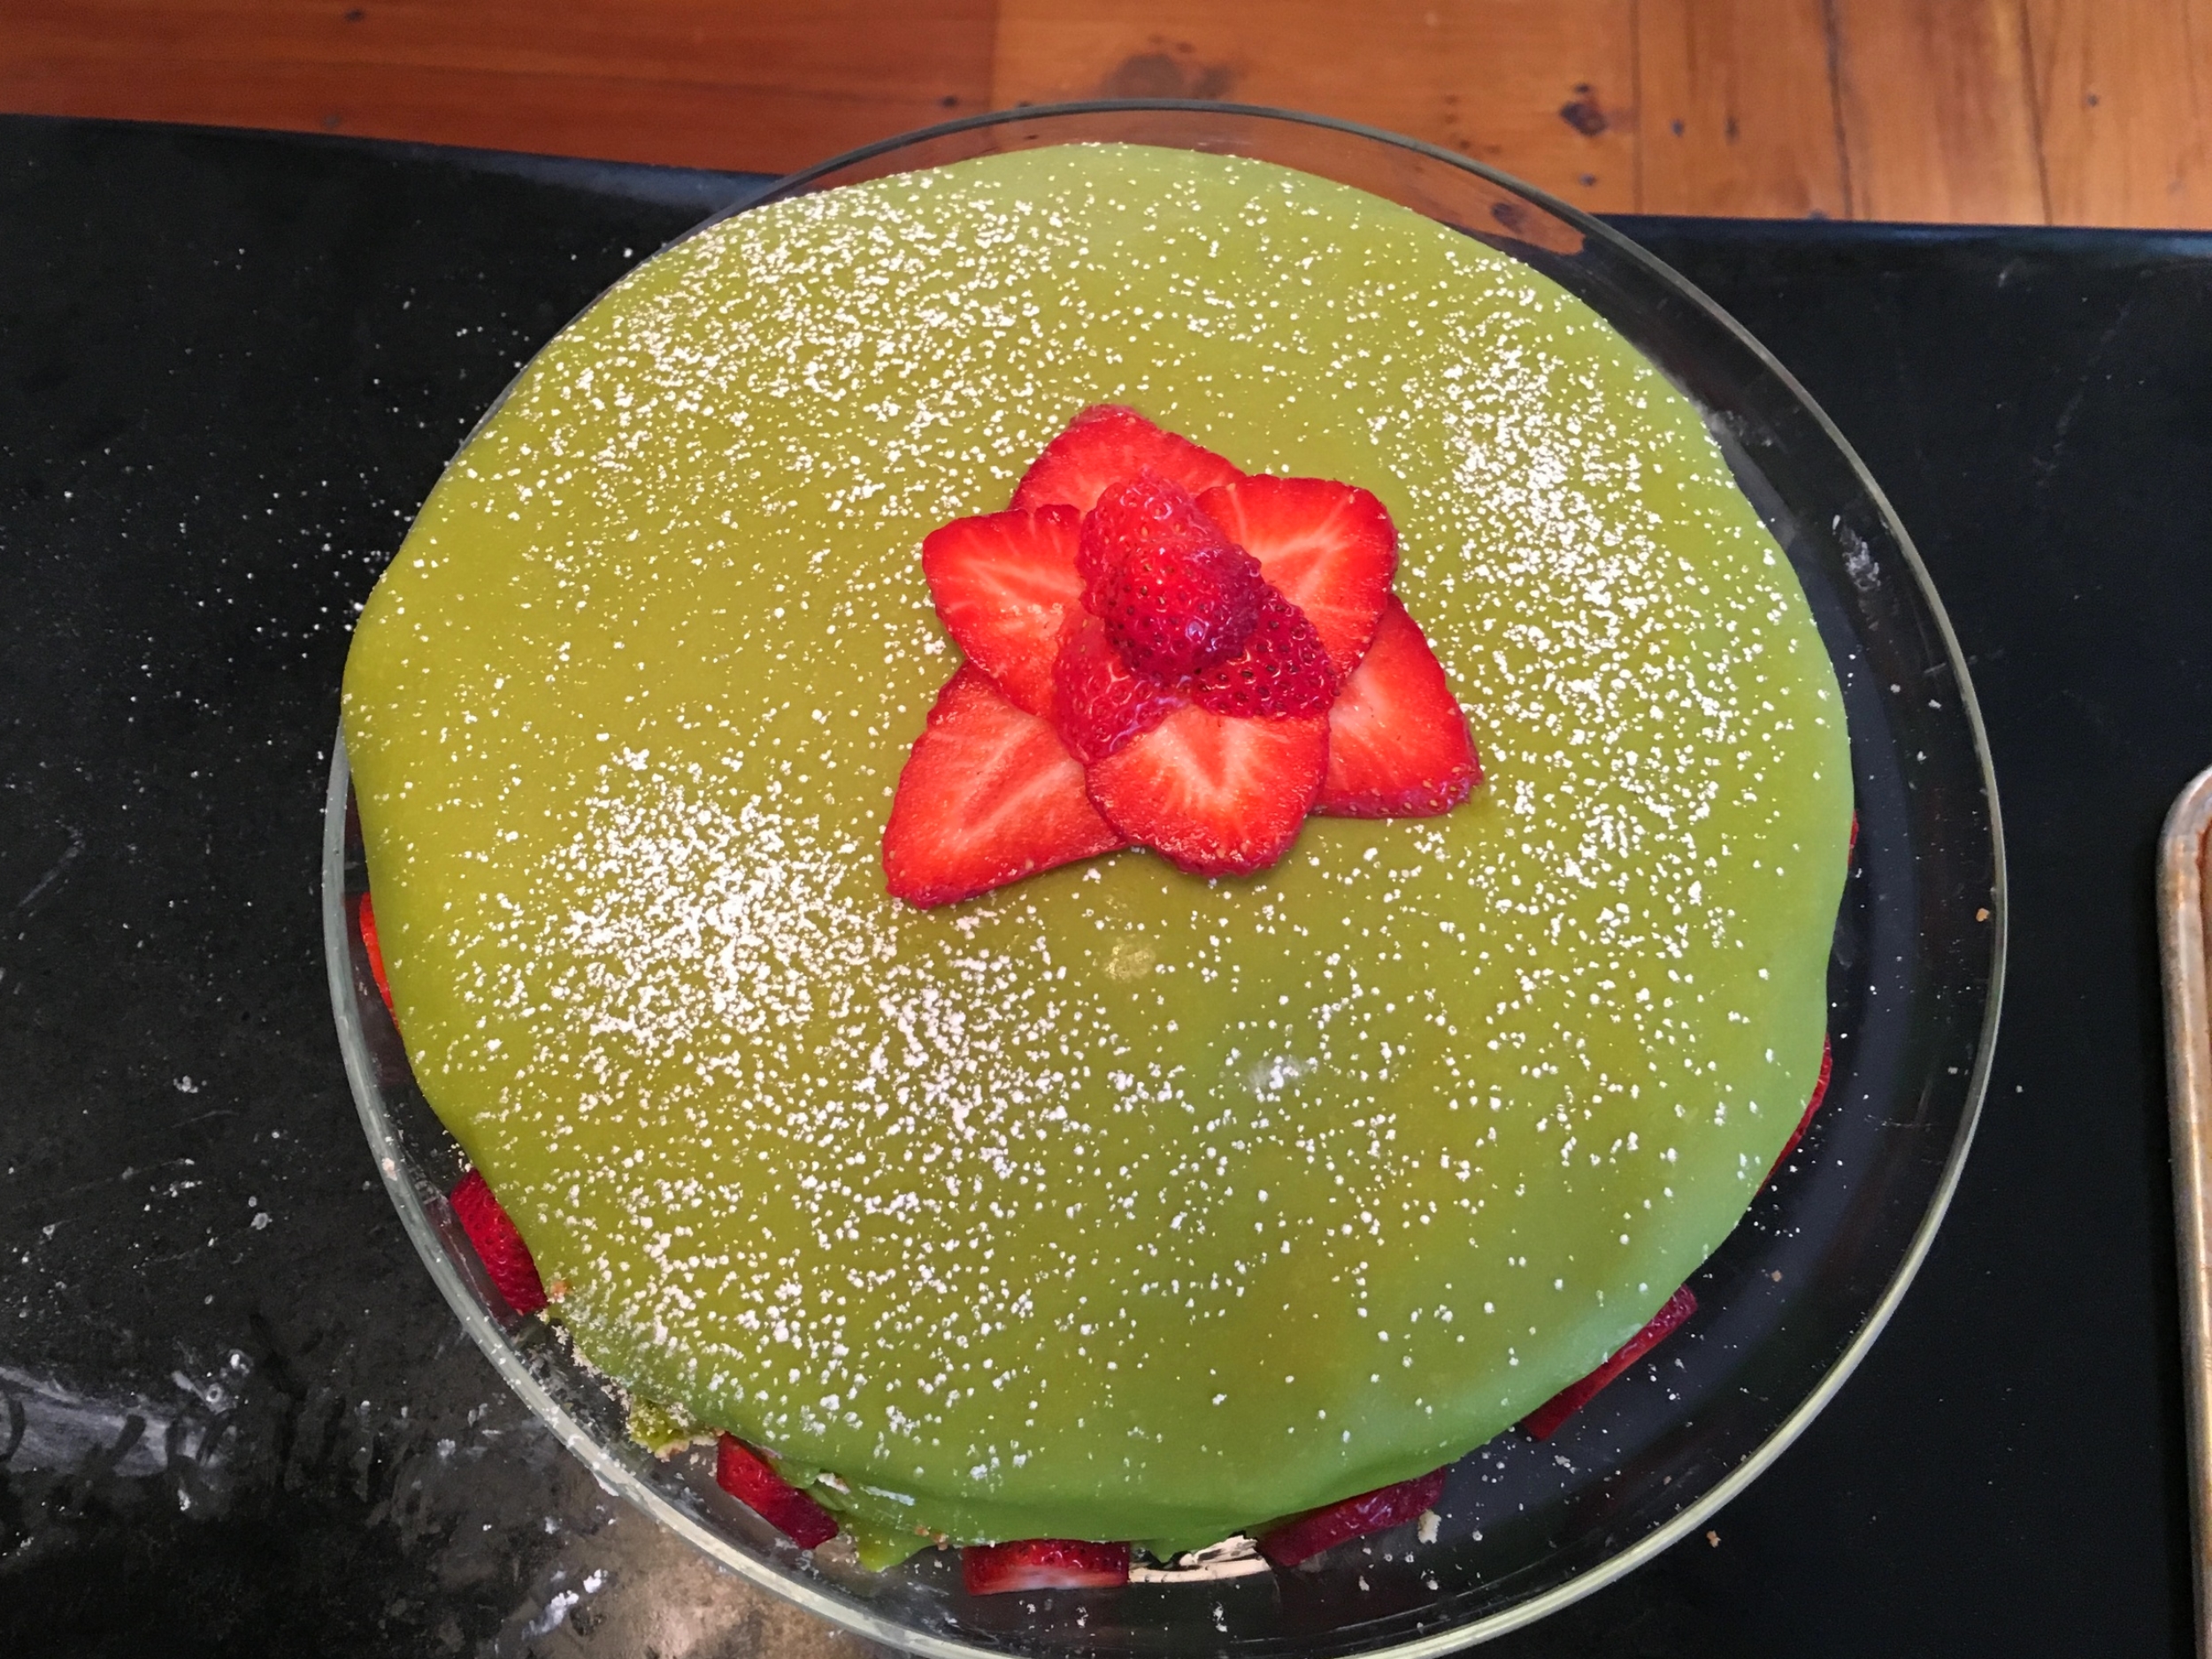
Did I get it perfectly smooth? Not at all. Did I mound the cake up the proper amount? Probably not. But, it was really nothing that a little sprinkling of powdered sugar and a few strategically-placed fresh berries couldn't fix. Traditionally, the Prinsesstarta is decorated with powdered sugar and a marzipan berry in the middle. I forgot to save out some white marzipan to dye red/pink for the middle berry. (See, everyone makes mistakes in the kitchen.) So, I opted to put fresh berries on top. Although they looked beautiful and tasted so fresh and Spring-y, I only recommend using fresh berries if you're going to serve the cake immediately. We cut into our cake about 2 hours after assembling it, and even though we kept it in the fridge the entire time, the berries eventually started weeping and made the marzipan look a little less "perfect." So, it's really up to you. For taste, I'd opt for fresh berries. For long-time looks, I'd make a marzipan berry. Either way, do add something because the pink and green are so cheerful together. This really could be your Easter or Spring celebration cake.
I do hope you'll make this cake. It really is a show-stopper and you will not be disappointed. It might take as long as your shopping trip to IKEA, but you'll get a lot more satisfaction out of the experience.* Trust me.
*Full disclosure: I still love going to IKEA.